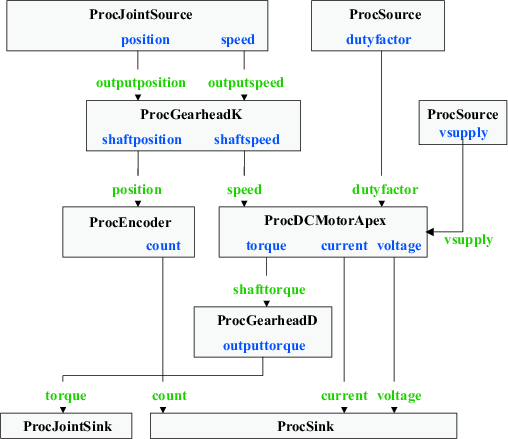
Figure 1.Dataflow graph for a simple DC motor connected to a simulated joint, diven by external inputs.
All of the data processors necessary to build this model are already provided with the library. We will use ProcDCMotorApex to model the combination of the DC motor with the APEX drive and the LC filter in between. The reason these two must be combined in a sinble block is because there is feedback between the motor and the motor drive due to the armature current which affects the terminal voltage of the motor. Attempting to capture as two separate processors would have resulted in a cycle, which is unsupported by the current RTI implementation.
In order to avoid cycles, we also need to divide the gearhead into two processors, ProcGearheadK, which converts position and speed readings from the simulated joint to position and speed states of the motor shaft, and ProcGearheadD, which converts the torque output of the motor shaft to a torque output to the simulated joint. Once again, attempting to combine these in a single processors would have resulted in a cycle because the motor model requires shaft speed as an input, and provides shaft torque as output.
Modeling the encoder is easy, and is handled by ProcEncoder. We establish the connection to the simulation system with the processors ProcJointSource and ProcJointSink, which are once again split to avoid introducing cycles. Finally, external commands are channeled through a generic ProcSource with proper output channels, and sensor readings are pushed into a generic ProcSink for external reading.
The following figure illustrates the data flow graph that we seek to implement using RTI. The figure is organized such that data flows from the top to the bottom as processors perform their computations.
Figure 1.Dataflow graph for a simple DC motor connected to a simulated joint, diven by external inputs.
The code necessary to create this dataflow graph is quite straightforward, but a little tedious to put in place. We first need to define the parameters required by various processors we need.
#define RSIM_TORQUE_CONST 0.0161        // Torque constant ( Nm / A )
#define RSIM_RA           1.34          // Armature resistance (in ohm )
#define RSIM_SPEED_CONST  55.3685       // Speed constant ( rad/s / V )
#define RSIM_ENC_RATIO    2000          // Encoder ratio ( count/rev )
#define RSIM_GEAR_RATIO   (1.0/33.0625) // Gear ratio (output rev / shaft rev)
#define RSIM_GEAR_EFF     (0.9)         // Efficiency of the gear
  sim::gearhead_param_t gparams = { RSIM_GEAR_RATIO, RSIM_GEAR_EFF };
  sim::encoder_param_t encparams = { RSIM_ENC_RATIO, 16 };
  sim::dcmotor_param_t mparams = {
    RSIM_TORQUE_CONST, RSIM_SPEED_CONST, RSIM_RA
  };
  sim::apexchip_param_t dparams = { 0.45 };
We are now in a position to create all the data processors used in the dataflow graph.
  sim::ProcGearheadK   * gk;
  sim::ProcGearheadD   * gd;
  sim::ProcEncoder     * enc;
  sim::ProcDCMotorApex * motor;
  sim::ProcJointSource * jointsrc;
  sim::ProcJointSink   * jointsnk;
  sim::ProcSink        * extsink;
  sim::ProcSource      * extsource;
  sim::ProcSource      * battery;

  const char *battery_names[]   = { "vsupply" };
  const char *extsink_names[]   = { "count", "voltage", "current" };
  const char *extsource_names[] = { "dutyfactor" };

  // Create the battery processors
  battery = new sim::ProcSource( "battery", 1, 1, battery_names );
  battery->setValue( 0, 24.0 );
  mysink = new sim::ProcSink( "filesink", 1, 5 );

  // Locate the simulated CDL joint to be driven
  sim::Joint *joint = cdl->findJoint( "motorjoint" );

  // Create the motor, gear and encoder models
  gk    = new sim::ProcGearheadK( "gearheadk", 0, & gparams );
  gd    = new sim::ProcGearheadD( "gearheadd", 0, & gparams );
  enc   = new sim::ProcEncoder( "encoder", 0, & encparams );
  motor = new sim::ProcDCMotorApex( "dcmotora", 0, &mparams, &dparams );

  // Create processor connections to the simulated joint
  jointsrc = new sim::ProcJointSource( "jointsource", 0, joint );
  jointsnk = new sim::ProcJointSink( "jointsnk", 0, joint );

  // Create external command hooks
  extsink   = new sim::ProcSink( "externalsink", 0, 3, extsink_names );
  extsource = new sim::ProcSource( "externalsource", 0, 1, extsource_names );
  extsource->setValue( 0, 0.0 );
Finally, we can create all the necessary connection to obtain the dataflow graph of the above figure.
  hipsnk->connect( "torque",         gd[i],     "outputtorque" );
  msink->connect ( "count",          enc[i],    "count" );
  msink->connect ( "voltage",        motor[i],  "voltage" );
  msink->connect ( "current",        motor[i],  "current" );
  gd->connect    ( "shafttorque",    motor,     "torque" );
  enc->connect   ( "position",       gk,        "shaftposition" );
  motor->connect ( "dutyfactor",     extsource, "dutyfactor" );
  motor->connect ( "vsupply",        battery,   "vsupply" );
  motor->connect ( "speed",          gk,        "shaftspeed" );
  gk->connect    ( "outputspeed",    jointsrc,  "velocity" );
  gk->connect    ( "outputposition", jointsrc,  "position" );
It is usually easier to establish the connections starting from the sinks, going up to the sources. In any case, the completeness of connections as well as the presence of cycles can be checked with a simple call to the processor manager.
sim::ProcessorManager::instance()->verify( "RTI:" );
When the simulation is run through CDL, data processors are automatically updated at a rate equal to the integration rate of the simulation. This means that the oint torque will be appropriately set at every iteration of the simulation, yielding a fairly accurate approximation of the motor model. External control commands and sensor reads must be handled in between calls to advance the simulation time, usually done from a higher level loop driving the simulation (seeCDLInterface class documentation).