Generating SSH Keys
From CIMDocs
Contents[hide] |
SSH key-based authentication is more secure than password
authentication as keys tend to be considerably longer than passwords
and therefore considerably harder to guess. CIM uses SSH keys for
controlling access to certain resources, such certain clusters. To
access these resources, you will need to generate a SSH key.
Linux
Almost every modern version of Linux or UNIX has OpenSSH installed by default. This is the version that is installed on the vast majority of machines at CIM, and this howto is written for OpenSSH. If you do not have OpenSSH on your machine, you can use the installation on serveraddress.
Generating Keys
OpenSSH comes with a program called ssh-keygen for generating SSH keys. Generally, to generate a SSH key, you can just use a command line such as the one below. This will specify that you are generating a 4096 bit key, which ensures that you have an extremely secure key.
| Shell: Generating a SSH key |
ssh-keygen -b 4096 |
Outputting the Public Key
OpenSSH
When prompted for a file, the default of $HOME/.ssh/id_rsa should be fine. Make sure to enter a passphrase, the security of your generated key depends on it. Once the key has been generated, you will have two files. The private key will be stored in the file name you entered above, the public key will have the same name, with ".pub" appended to it. So the default file name for the public key will be $HOME/.ssh/id_rsa.pub. The contents of the ".pub" file is what you will need to send to the CIM systems staff so they can grant your key access to resources. The simplest way is probably to output the file, copy it and paste it into an email.
| Shell: Outputting the public key in OpenSSH format |
cat $HOME/.ssh/id_rsa.pub |
Commercial SSH
In some cases, the CIM systems staff may need your ssh key in commercial SSH format. In these cases, you can use the following command to output the key in the appropriate format, when it prompts you for a file, enter the filename you specified when generating the key.
| Shell: Outputting the public key in Commercial SSH format |
ssh-keygen -e |
Using Keys
If you used the default location for your key, OpenSSH should find the key and prompt you for the passphrase automatically. If you chose a different location, you can specify the file with the -i switch.
| Shell: Specifying a key to use |
ssh -i ~/.ssh/id_rsa serveraddress |
Using ssh-agent
The ssh-agent program included with OpenSSH can store your SSH key in memory so you can log in with key-based authentication without needing to type your passphrase. If you are running Gnome or KDE, there should already be a ssh-agent running in your session, and all you need to do is add your key with ssh-add.
| Shell: Adding your key to the ssh-agent |
ssh-add |
If you used a nonstandard filename for your key, you can specify the name on the command line.
| Shell: Adding your key to the ssh-agent specifying the file name |
ssh-add ~/.ssh/id_rsa |
You can also specify multiple keys on the command line.
If you are running a desktop that does not start an agent for you, you can start it manually simply by typing the command ssh-agent.
| Shell: Starting a SSH agent |
ssh-agent |
You will get output that looks something like this:
Windows
Under Windows, CIM recommends using PuTTY for SSH. PuTTY is a free, open-source SSH client for Windows and Unix that is under active development. Please see the SSH page for more information.
Generating Keys
To generate a SSH key with PuTTY, you will need PuTTYgen, which can be downloaded separately from the PuTTY download page, or can be downloaded as part of the PuTTY install package. If you use the installer, PuTTYgen will be located on the start menu under Start->All Programs->PuTTY->PuTTYgen.
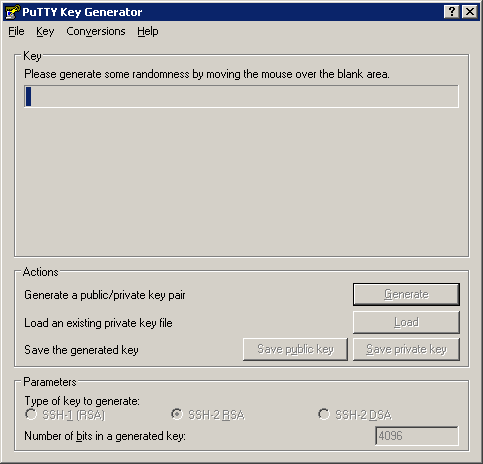
Once you have obtained PuTTYgen, start it, in the lower right there you will see a text box for Number of bits in generated key, change this to 4096.

|
Click Generate, you will be asked to move your mouse around in the blank area to generate randomness. This uses mouse movement to ensure that completely random numbers are used to generate the key.
|
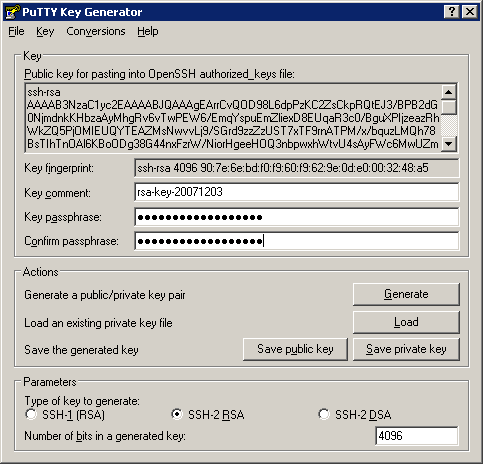
Once the key is generated, select the text in the area marked Public key for pasting into OpenSSH authorized_keys file: and copy it to the clipboard. This is the information that the CIM systems staff will need to grant your key access to resources. You can paste it into an email to the CIM Systems Staff immediately if you wish.

|
You will need to save your key, but first you should set a passphrase. To set the passphrase type it into the Key passphrase and Confirm passphrase text boxes. When selecting your passphrase, please select a secure phrase. Preferably at least 12 characters with numbers, capital letters, small letters and punctuation.
|
Once you have set a passphrase, you will need to save the key, you can click Save private key to save the private key. Please select a safe location to save the key, and keep a backup so you do not loose it. Also try to make sure that the key is secure. The private is the key you will need to access resources.
Once you have saved your private key, you can optionally save your public key, this is useful to have in case you wish to access more than one resource with the same key.
Using keys
To use the key, you will need to use Pageant, this is available on the PuTTY download page, and is included in the PuTTY install package. After installing the PuTTY install package, Pageant will be available at Start->All Programs->PuTTY->Pageant. When you start Pageant, you should see a new icon in your system tray, right click on this icon and select Add key. Select the private key file you saved earlier and enter the passphrase when you are prompted.

|
Once you have added the private key to the Pageant, use PuTTY to connect to the resource you need to access as usual (see the SSH page for more information). You will not be prompted for a password when you connect. Pageant keys will also work with WinSCP.